Just because the days are getting shorter and cooler doesn’t mean it is time to put away your BBQ grill. Fall continues to be a great time to grill and the holidays are right around the corner, so it is the perfect time to up your cooking game.
The MeatStick WiFi Pro Set will allow you to perfectly cook steaks and other cuts of meat on your grill, in your smoker, and even in your oven. And, a Grillbot makes the job of cleaning up your grill after you have finished cooking quick and easy. Not only will your food taste better, but you get to spend more time with your friends and family.
The MeatStick
I am a firm believer in using a thermometer when cooking proteins. There is nothing worse than serving an overcooked steak or undercooked poultry to guests. A meat thermometer allows any cook to serve perfectly prepared proteins every time.
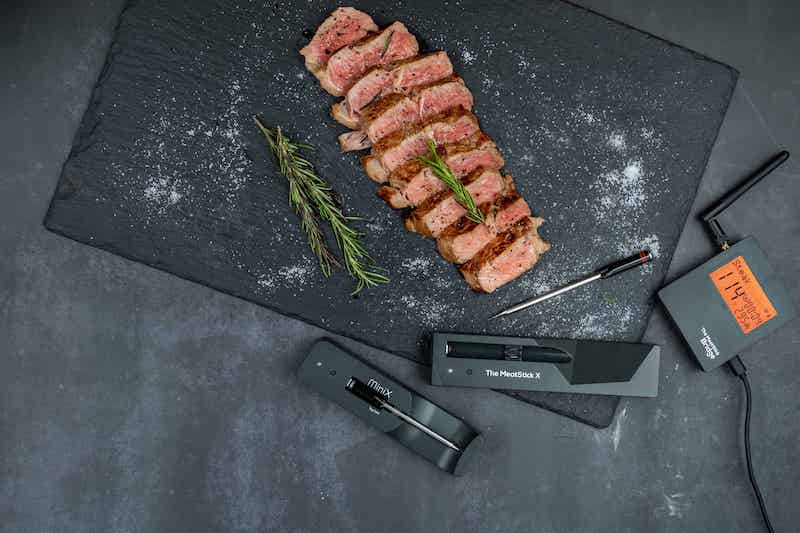
I had the chance to try the MeatStick WiFi Pro Set. The WiFi Pro set consists of:
- The MeatStick wireless meat thermometer with its charging case
- The MeatStick Mini meat thermometer with the MiniX charging case
- The MeatStick Wi-Fi Bridge
The MeatStick wireless meat thermometer is designed for use in a BBQ grill. It includes two temperature sensors. The first sensor is in the middle of the MeatStick approximately two inches from the tip. It measures the interior temperature of the meat being cooked – the temperature range is 32° Fahrenheit to 212° Fahrenheit.
The second sensor is in the ceramic handle of the MeatStick and measures the ambient temperature inside of the grill – The temperature range is 32° Fahrenheit to 572° Fahrenheit.
The high range of the ambient temperature sensor in the MeatStick makes it perfectly safe to use inside a grill during normal cooking. However, the MeatStick cannot be used when searing meat. Searing temperatures can reach 1000° Fahrenheit and would damage the MeatStick.
When cooking a steak that requires searing, you have two choices. First, you can simply sear the steak before inserting the MeatStick. This does involve holding the steak steady with either tongs or with a silicone oven mitt and inserting the MeatStick with your free hand. The challenge with this approach is to get the MeatStick centered in the middle of the steak so you get an accurate temperature measurement.
The second approach is to reverse sear your steak. Reverse searing involves cooking the meat to slightly below your target temperature (135° Fahrenheit for a medium rare steak), remove the MeatStick, and then sear the steak. This works well if your grill has a searing pad and you can quickly sear the meat. However, if you are just going to sear the meat on a hot portion of the grill, my own experience is that the meat will not sear fast enough and you will raise the internal temperature of the meat beyond your target temperature. There is nothing worse, in my opinion, than overcooking a good steak.
The MeatStick Mini for Oven Use
While the MeatStick is designed for use on a BBQ grill, the MeatStick Mini is designed for use in an oven. As the name suggests, the MeatStick Mini is smaller; 3-3/4 inches versus 5-5/16 inches long. The MeatStick Mini’s probe is also slightly smaller in diameter. The smaller size of the MeatStick Mini makes it ideal for measuring the internal temperature of smaller cuts of meat as well as a chicken and even a Thanksgiving turkey.
The MeatStick Mini doesn’t include an ambient temperature sensor; it only measures the internal temperature of the meat being cooked. This shouldn’t be an issue as an oven already has its own thermostat for setting the oven’s cooking temperature.
Both the MeatStick and the MeatStick Mini are designed to be very durable and, for convenience, dishwasher safe. They also both communicate with the MeatStick app on your smart phone over a Bluetooth connection.
It should be noted that with a grill, or oven, closed you can expect the connectivity between your smart phone and the probe to be up to six feet. With the grill or oven door open, you can expect up to 33 feet of connectivity. The charger included with the MeatStick and the MiniX charger available as an option with the MeatStick Mini will extend the distance between the probe and where you can walk with your smart phone up to 260 feet.
While I have referenced using the MeatStick in a grill and a MeatStick Mini in an oven, there are many other places you can use these two wireless temperature probes including:
- In pans on your stovetop
- In a smoker
- In a Sous-Vide cooker
- When deep fat frying
The MeatStick Wi-Fi Bridge
Also included in the MeatStick Wi-Fi Pro set is the MeatStick Wi-Fi Bridge. With it you can link up to eight MeatStick or MeatStick Mini temperature probes with the MeatStick cloud through your home’s internet connection. Then you can monitor your cooking temperatures in real time from anywhere where your smart phone or tablet has an internet connection.
For example, you might be smoking a salmon filet in a pellet smoker for four hours to serve at a dinner party. With the MeatStick connected to the MeatStick Wi-Fi Bridge, you can run to the store to purchase the ice cream you forgot to get for desert and still continue to monitor the cooking process.
If you don’t have the MeatStick Wi-Fi Bridge and you are cooking multiple pieces of protein, you can still monitor up to eight MeatStick or MeatStick Mini temperature probes using the MeatStick app. You will just be limited to the distances outlined above for a Bluetooth connection between the probes and your smart phone/tablet that is running the app.
Hands on with the MeatStick Pro
The MeatStick Pro set comes in a convenient zipped nylon case that includes storage for all the products included with the Pro set and storage for up to eight additional MeatSticks or MeatStick Minis. Also included is an instruction booklet to get all the products – including the MeatStick Wi-Fi Bridge – up and running. However, there are a few additional items you will need.
First, you will need a total of four AA batteries for the charging cases. Once you have inserted two batteries in each charging case, pressed the button on the case, and observed the LED illuminate green signifying that charging has started, MeatStick recommends you wait a minimum of four hours for the MeatSticks to fully charge before using them.
Second, you will need either a USB power supply or USB battery pack to power the MeatStick Wi-Fi Bridge. Since the MeatStick Wi-Fi Bridge needs to be placed within six feet of a closed grill where you are using the MeatStick, powering the Wi-Fi Bridge with a USB battery pack would be a more convenient way to use it, unless your grill happens to be located near an outdoor outlet.
The first step to setting up the MeatStick for use is to install the MeatStick app from either the Apple App Store or Google Play Store. The app includes a short video tutorial for first time users. The video is packed with information so be prepared to hit the pause button while watching it as the video moves through the material very quickly.
The app then walks you through the process of setting up your MeatStick and provides a great deal of additional information on using the MeatStick. Afterwards, the app continues into an additional tutorial on using the MeatStick during cooking. After that tutorial was finished, I was finally prompted to turn on my MeatStick so it would be detected by the app. However, since I had the WiFi Bridge I thought I needed to set it up so the MeatStick would be connected to the Bridge. At this point I wasn’t quite sure what to do. So, I simply tried plugging in the bridge. Sure enough, once the Bridge finished booting it was immediately detected by the app and I was guided through the Bridge setup including connecting it to my WiFi network.
Finally, I was Ready to Start Cooking
Cooking with the MeatStick is very simple. To create a “cook,” you start by turning on the MeatStick by pressing the button on the charging base while the MeatStick is in the case.
Next you select how you are going to be cooking your meat:
- In the oven
- On the stovetop
- On the grill
- In a smoker
- Sous Vide
- Deep frying
Next you select the protein you will be cooking:
- Beef
- Poultry
- Pork
- Seafood
- Lamb
- Plant-Based
I had selected that I was going to cook a piece of beef on the grill. So, I was provided with a selection of different cuts of beef to choose from:
- Steak
- Flank Steak
- Ribs
- Tenderloin
- Burger Patty
Once I had selected “Steak” from the list, I was asked how I wanted my steak cooked (rare, medium-rare, etc.). In addition, I was given the option of selecting the target ambient temperature for my grill.
Finally, I was reminded to insert the MeatStick fully into the thickest part of my steak. After pressing the “Start Cooking” button, I was ready to throw my steak on the grill.
Now the reality is that I first needed to sear my steak over direct, high heat, on my grill. Because this temperature would be too high for MeatStick, I had to wait until the searing was finished and then insert the MeatStick into the steak. Inserting the MeatStick into a hot steak isn’t ideal. However, this problem isn’t unique to the MeatStick. The problem is faced by all the similar wireless, meat sensors that I’ve tried.
The problem of inserting the MeatStick into the center of a hot steak is even more challenging in a thinner cut of meat. If you are inserting the MeatStick into a two-inch thick cowboy rib eye, it is easy to get the tip of the MeatStick close to the center of the steak where it will accurately measure the internal temperature of the meat. On the other hand, if you cooking a one inch thick or less, steak from a typical grocery store, then even if you are slightly off line when you insert the MeatStick into the steak, the tip of the MeatStick will be close to the surface of the steak and your internal temperature measurements won’t be accurate. It isn’t that the MeatStick can’t be inserted straight into the middle of a thinner cut of meat; it is just that care has to be taken to do it properly.
If you insert the MeatStick properly into your steak, then it will do its job and you will get a perfectly grilled dinner worthy of serving to guests. Otherwise, the steak will be too rare, and you will have to put it back onto the grill to cook a little longer.
Areas for Improvement
There are a couple of ways I believe the MeatStick could be improved:
Accounting for the Rest Period
First, when you cook a piece of meat, especially a good steak, you need to let it rest for several minutes before you carve it for serving. As the meat rests the juices are allowed to redistribute throughout the meat. This makes the steak much juicer when you serve it. And, to keep the meat from cooling down while it is resting it is a good practice to cover it with a piece of aluminum. However, during the resting process, the internal temperature of the meat can rise up to 5° Fahrenheit. So, if you cooked your steak to a target internal temperature of 135° Fahrenheit (medium-rare) and you let it rest you may end up with a 140° Fahrenheit steak that is much closer to medium than medium rare. The MeatStick app should account for resting. It should cook a steak to five degrees below the true target temperature, provide a timer to guide the user through the resting process, and prompt the user to cover their steak with a piece of aluminum foil. This will help the amateur griller become a master.
More Surface Stability
The MeatStick has small nubs on its ceramic end designed to keep the MeatStick from rolling; possibly off a countertop and onto the ground. However, these need to be bigger as there is still to easy for the MeatStick to roll; especially if the surface it is placed on isn’t perfectly level.
More Stability for the Wi-Fi Bridge
The case for the MeatStick and MiniX case for the MeatStick Mini have magnets in them so they can be placed on grill, where they can act as Bluetooth “Xtenders” for temperature probes. This minimizes the chance for a case to fall on the ground where it could be damaged. However, the MeatStick Wi-Fi Bridge also needs to be to be placed on, or very close to, the grill. It runs the same risk of falling and being damaged but doesn’t include magnets to hold it in place. I would argue that the chance of the Wi-Fi Bridge falling is even higher because when it is powered using a plug-in power supply and an extension cord there is a real risk that someone could trip, or pull on, the extension cord. The WiFi Bridge needs to have magnets to hold it in place.
Overall, the MeatStick is a quality product that can improve anyone’s ability to consistently cook proteins to the perfect temperature for serving. The addition of the Wi-Fi Bridge removes the leash that keeps a home cook sitting next to their grill, smoke, or oven when cooking and allows them to mingle with guests or focus on the preparation of the other parts of the meal.
Grillbot
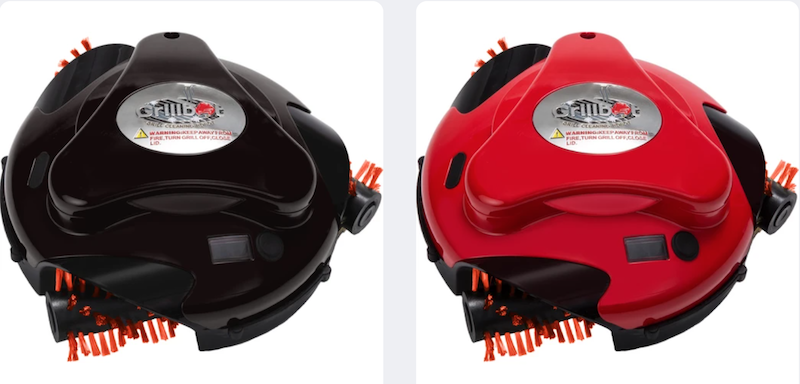
Nobody wants to serve food from their grill that has burned pieces of last week’s dinner stuck to it. This is where the Grillbot comes to the rescue. What a robotic vacuum is to floors, the Grillbot is to grills; a small robot that cleans your grills either before or after use.
The Grillbot has three rotary brushes that clean your grill’s grate. There are three brush options available:
- Stainless steel brushes for cast iron grates
- Brass brushes that won’t scratch stainless steel or porcelain grates (included with the Grillbot)
- Nylon brushes that are even softer than brass brushes but last longer than either stainless steel or brass brushes
The brushes can also be very easily removed from the Grillbot, with the push of a button, and placed in a dishwasher for clean up.
The Grillbot is very easy to use. When you first unpack the Grillbot, you need to fully charge the internal battery using the included charger. Once the battery is fully charged (this can take up to eight hours), you simply place the Grillbot onto your grill, press the button once for the Grillbot to spend 10 minutes cleaning your grill, twice for 20 minutes, and three times for 30 minutes. A small LCD display on the Grillbot will show 10, 20, or 30 depending on how long the Grillbot will run.
Next you need to close the lid on your grill and after five seconds the Grillbot will begin cleaning. It is important to close the grill cover to make sure the Grillbot doesn’t travel over the edge of your grill and fall on the ground. After the Grillbot has finished cleaning for the specified amount of time, you simply remove the Grillbot from your grill, remove the cleaning brushes from the Grillbot, and place the cleaning brushes into your dishwasher.
Hands on with the Grillbot
There is very little to say except the Grillbot works as advertised and does a good job of cleaning the grates on a grill. There is no intelligence in the device and no app to download. The Grillbot simply moves randomly around your grill cleaning the cooking grates. I own a Grillbot and have found that 10 minutes is more than adequate for cleaning my grill after cooking, as long as I use the Grillbot after each meal I prepare. My grill is fairly small (a two burner Weber) so someone with a much larger model may find they need to run the Grillbot longer.
One thing that is important to keep in mind is that your grill must be under 250° Fahrenheit to use the Grillbot. In fact, the Grillbot has a built-in temperature sensor and will not run if your grill is too hot. This keeps the excessive heat from damaging the Grillbot.


