WeatherFlow launched as a company in 2000, after its founders recognized that accurate weather data was not available everywhere and that this led to inaccurate forecasts. To mitigate this issue, they installed a large network of high-quality weather stations that provided much better coverage than the typical airport weather stations that historically provided weather data around the country. They then leveraged this network of stations to provide weather data, modeling, and forecasting information to their clients and partners, including:
- Federal, State, and Local Government Agencies including NOAA, National Weather Service, National Hurricane Center, The US Coast Guard, and others
- Corporate and Professional Organizations including American Meteorological Society, MesoWest, and the American Wind Energy Association
- Academic and Research Associations including Duke University, University of Utah, and various coastal ocean observing systems
In 2016, WeatherFlow launched an Indiegogo campaign for their first consumer weather station, the WeatherFlow Smart Weather Station. The station consisted of separate air and sky modules. The air module included sensors for measuring temperature, humidity, pressure, and lightning strikes. To keep the sun from impacting the sensor readings, the module needed to be mounted in the shade. The sky module included a light sensor (for measuring ambient light, UV index, and solar radiation), haptic rain sensor (for determining rain onset, measuring intensity, and measuring accumulation), and ultrasonic wind sensors (for measuring wind speed and direction).
WeatherFlow broke new ground using haptic sensor technology to measure rain and ultrasonic sound technology to measure wind speed and direction. This technology removed the necessity for any moving parts – a point of eventual wear and failure in other weather stations.
I supported the Indiegogo campaign and have been a satisfied user ever since. WeatherFlow’s open API and IFTTT service made this an ideal weather station to integrate into a smart home, and I wrote a Crestron smart home system integration module that has been available on my GitHub – https://github.com/jbasen/Crestron-WeatherFlow.
One problem with the original WeatherFlow Smart Weather Station Sky module, however, was that even using lithium batteries the unit was fairly power hungry, and batteries had to be replaced fairly often. This was problematic if you installed the Sky module on a roof to provide it with unrestricted airflow for accurate measurement of wind speed and direction. WeatherFlow addressed this issue by developing a solar power system that could be retrofitted to existing Sky modules and eliminated the need to use replaceable batteries to power the module.
In 2019, WeatherFlow launched Indiegogo and Kickstarter campaigns for their next-generation smart weather station, the Tempest Weather System.
Tempest Weather System
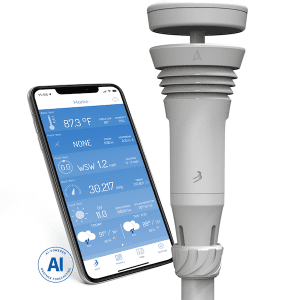
WeatherFlow leveraged their experience from the original Smart Weather Station when designing the Tempest Weather System. With 7,700 backers from their Indiegogo and Kickstarter campaigns, WeatherFlow began shipping the first production units in May 2020. The Tempest Weather System combines the original Smart Weather Station’s Air and Sky modules into a single device. It includes the same sensor technology that was used in the original Air and Sky modules and reports the following:
- Air Temperature
- Ambient Light
- Barometric Pressure
- Humidity
- Lightening Strikes and distance from the station to the strike
- Rain Accumulation
- Rain Duration
- Rain Intensity
- Rain Onset
- Solar Radiation
- UV Index
- Wind Speed
- Wind Direction
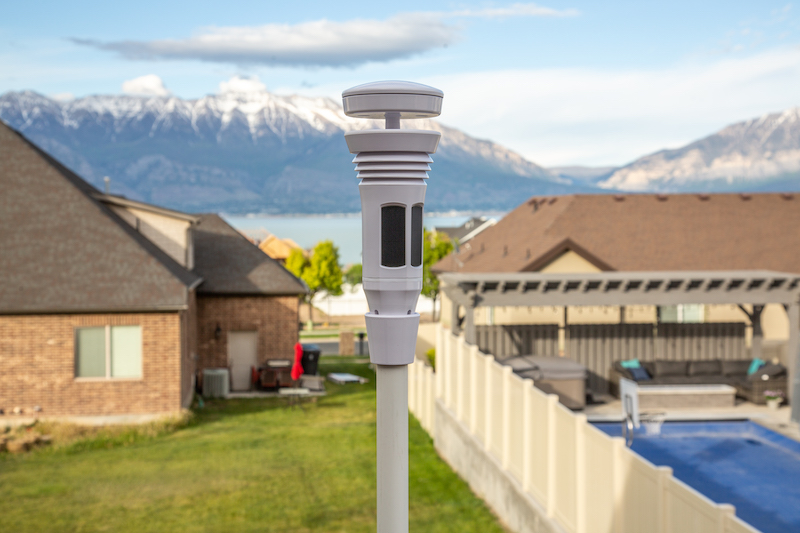
The Tempest Weather System can easily be mounted on a flat surface, one-inch diameter pole, or on any stand with a quarter-inch threaded screw mount, such as a camera tripod. It can be located up to 300 meters (over 1,000 feet) from its Wi-Fi hub. This allows the station to be placed well away from any buildings, trees, etc. that could interfere with its wind measurements.
Powering the Tempest, no matter where it is located, is not a problem because it includes built-in solar panels. The positioning of the solar panels even allows them to be effective at powering the weather station in far northern regions, such as Alaska. In these regions the low angle of the sun during the winter makes upward facing solar panels less effective.
The Tempest Weather System is made of marine-grade plastic that is resistant to weather and aging from sunlight. Combining this with WeatherFlow’s elimination of moving parts (through the use of haptic sensors for rain and ultrasonic sensors for wind), means that the Tempest Weather System should last for many years and, in fact, is backed by a 10- year extended warranty.
Smart Home Integration of the Tempest Weather System
It can be extremely valuable to integrate hyper-local weather data into a smart home. From the beginning, WeatherFlow provided an open API to allow third-party developers to integrate their weather stations with smart home platforms. Smart home platforms that use this API to integrate with WeatherFlow’s weather stations are Crestron, Homey, Universal Devices, openHAB, HomeSeer, and Indigo.
In addition, both the WeatherFlow Smart Weather Station and the Tempest Weather System also integrate with Amazon Alexa, Google Assistant, and IFTTT. WeatherFlow also has announced upcoming integrations with Siri and SmartThings.
As mentioned above, the integration of hyper-local weather with a smart home can be very valuable. Here are a few ways you can make use of weather data in a smart home:
First, when a weather station detects that it is raining, you can:
- Automatically close motorized windows.
- Integrate the data with open/close status of windows from a connected alarm system and send a notification to your smart phone if windows were left open. This could avoid costly water damage from the rain entering an open window.
- Send a delay command to a smart sprinkler controller if the accumulated rain exceeds a predefined threshold.
- Send a connected, robotic lawn mower back to its charging base.
When a weather station detects high winds, you can:
- Send a delay command to a smart sprinkler controller since the water will be carried by the winds and won’t reach the intended locations of your lawn.
- Send a message to your smart home system to automatically retract the glass walls around a pool house, for instance, to protect expensive screens from being damaged by flying debris. I had a customer with an award-winning home with this actual use case. They had a large pool house in the back yard where two walls of the pool house could be either enclosed with sliding glass panels, completely open to the outside, or enclosed with large motorized screens.
Levels of sunlight and UV can be used to:
- Automatically close motorized blinds, shades, and drapes on very bright days to protect expensive furnishings from damage from sunlight.
- Send reminders to reapply sunscreen when a backyard pool is in use and the UV index is high.
Temperature readings can be used to:
- Send a delay command to a smart sprinkler controller when the temperature is below freezing.
- Assure the heat is turned on in a home when the outside temperature drops below freezing to avoid the possibility of a frozen pipe.
- Automatically close motorized blinds, shades, and drapes on hot days to help keep a home cooler.
- Automatically turn on ceiling fans on hot days when a home is occupied to make the home more comfortable without having to lower the air conditioning set point on the thermostat.
These are just a few examples that I hope will give you some ideas on how a smart weather station could be used in your own smart home.
Crestron Integration of the Tempest Weather System
I wrote the original Crestron-WeatherFlow integration module back in March of 2019. As part of this article, I have updated the module to better support the capabilities of the original WeatherFlow Smart Weather Station and to support the new Tempest Smart Weather Station.
To use the module, you will need to first obtain the station ID of your WeatherFlow Smart Weather Station or your Tempest Weather System and optionally the device ID of each module. This can be found by:
- Open up https://tempestwx.com/ in a web browser.
- Log in using the credentials you created during the installation process
- Click on the small weather station icon in the upper right corner of the web page. This will take you to page that displays the data coming directly from your weather station.
- Scroll to the bottom of the page click on the word Online with the green dot next to it. This will take you to the Status page.
- Enter the Station ID and Device ID’s as parameters in the Crestron-WeatherFlow integration module. If you have a Tempest station, leave the entries for Air and Sky Device ID’s set to zero. Similarly, if you have Air and Sky modules then leave the Tempest Device ID set to zero.
The Crestron-WeatherFlow module will then retrieve the data from your weather station through the WeatherFlow cloud service for use in your Crestron SimplWindows program. The module provides data in analog format and as strings that are formatted for display on a touch panel.
One thing to keep in mind is that the most common mistake people make when using this module is forgetting that they need to configure the Ethernet Settings on their Crestron processor with a valid DNS server.
Hands on with the Tempest Weather System by WeatherFlow
WeatherFlow supplied me with a Tempest Weather System to evaluate for this article, and so I could update the Crestron-WeatherFlow integration module that I wrote for the original WeatherFlow Smart Weather Station.
Included in the box are:
- The Tempest Weather System with the mounting base for installing the unit on a flat surface or on a stand with a quarter-inch threaded screw, such as a tripod
- Wi-Fi hub to integrate the Tempest Weather System with your home’s Wi-Fi network
- Power supply and USB cable for the hub.
- Mounting base to mount the weather station on a one-inch diameter pole such as a piece of PVC pipe or metal conduit.
- A card with directions for getting started that is titled, “Let’s get this party started.”
The Tempest Weather System is very easy to set up. The first step is to download the free Tempest app from the appropriate app store for your smart phone or tablet. The app then guides you through the setup process. The steps include:
- First you will need to create an account by entering an email address and password. This is a good time to remind people that devices installed in a home that you don’t plan on taking with you if you sold your house should be registered under an email address that can be handed off to the next homeowner instead of your personal email address. I wrote about this in an earlier article “Selling Your Smart Home? How Will It Work for the New Owner?”
- Plug in the hub that was included with the Tempest Weather System using the included power supply and USB cable.
- Remove the smart base from the Tempest Weather System to expose the power switch and the weather station’s ID number.
- Enter the hub serial number that is found on the base of the hub into the app.
- Next you will be prompted to enter a meaningful name for your weather station and set its location by allowing the app to use your location. The latitude, longitude, and elevation of your station will then be saved by the app.
- The app then prompts you to turn on the power switch located on the bottom of the Tempest Smart Weather Station
At this point, I had a minor glitch in the setup process, and my hub didn’t connect to the Tempest. This put WeatherFlow to the test, and I had to look for troubleshooting information in the Tempest Quick Start Guide on their website. It was easy to find and after pressing the green LED button on the bottom of the weather station I was able to get the hub and the weather station connected. Then, after selecting my Wi-Fi network SSID and entering the Wi-Fi password, I was up and running with the data from the weather station quickly populating the app.
The next step was to mount the weather station outside my house. I chose to do this on a piece of one-inch metal conduit that I mounted with brackets to the fence in my backyard. Wherever you decide to mount your Tempest Weather System there are a few things to keep in mind. First, for accurate readings the weather station should be mounted where the flow of wind to the unit won’t be disrupted by buildings, trees, etc. Second, for the wind direction readings to be accurate, you need to make sure that the blue triangle on the weather station is facing north. I suggest using one of the many compass smart phone apps for this.
Finally, during the mounting process, your handling of the weather station is going to create incorrect readings. You may even find that the unit’s haptic sensors, as mine did, misinterpreted the handling of the weather station for rain. Once the weather station is properly mounted you should, using the app, delete the data history. This is easily done by going to: settings à stations à choose your station à manage devices à choose the device à advanced à delete all data.
Once the Tempest is set up and running, there is nothing you need to do except to open the app to view the data or possibly add smart home integrations to Alexa, Google Assistant, or IFTTT.
Using the WeatherFlow’s web interface is also a lot of fun. Simply go to https://tempestwx.com/ and enter the username and password of your WeatherFlow account. Here you will find all data from your weather station and the 10-day forecast for your location as calculated by WeatherFlow (more on that below). In addition, if you click on “Map” at the top of the web page, you will be presented with a world map showing all the WeatherFlow weather stations around the world. If you zoom in on the map, you can click on any weather station and see its current readings. So, not only can you see the current weather conditions in, for example, San Francisco, but you can see the current conditions in any part of the city where someone has a WeatherFlow weather station. You might think there would only be a handful, but I can’t even count the number shown on the map. So, if you are living or visiting San Francisco, planning for dinner down by the waterfront, you can check the local conditions, including the temperature and how windy it is so you can dress appropriately.
Adding smart home integrations to Alexa, Google Assistant, or IFTTT is also very easy. Under the settings section of the app, simply choose Smart Home Integrations, choose the integration you want, and follow the account linking steps. For Alexa or Google Assistant, you will also need to install the appropriate skill on your smart speaker. You will then be able to say, for example, “Alexa, ask WeatherFlow, ‘How’s the weather?’” or “Hey Google, ask WeatherFlow for the temperature.”
The WeatherFlow IFTTT service provides a selection of triggers including:
- Lightning strike
- New observation
- Rain detected
- Brightness rises above
- Brightness drops below
- Humidity rises above
- Humidity drops below
- Pressure rises above
- Pressure drops below
- Solar radiation rises above
- Solar radiation drops below
- Temperature rises above
- Temperature drops below
- UV rises above
- UV drops below
- Wind speed rises above
- Wind speed drops below
These provide the foundation for almost any smart home automation you could want based on weather conditions.
Tempest Weather System Areas for Improvement
I found the Tempest Weather System to be an excellent product, so I don’t have a long list of suggestions for ways that WeatherFlow could make it even better. However, according to Bluefield Research, the monthly cost of water/sewage bills in the U.S. has risen more than 30 percent over the last 10 years. Today’s irrigation controllers rely heavily on weather data to calculate the amount of water to apply to homeowner’s lawns to minimize the expense of maintaining a lawn in a world of rising temperatures. Hyper-local weather data improves an irrigation controller’s ability to calculate the optimal amount of water to apply to a homeowner’s lawn and plants. Technically savvy homeowners can, in some cases, link their WeatherFlow weather station with their irrigation controllers. However, that can require a level of technical expertise that goes beyond the average homeowner’s capabilities. I would like to see WeatherFlow partner with irrigation controller companies to make the integration of WeatherFlow weather stations and irrigation controllers as easy as possible. This would benefit both homeowners and the environment.
WeatherFlow now offers a bird deterrent accessory that keeps birds from perching on top of the Tempest. The accessory is inexpensive at $9.95, so it only costs WeatherFlow a few dollars to manufacture. While I realize that the Tempest needs to be a profitable product for WeatherFlow, given the low cost of the bird deterrent accessory, I feel it should simply be included in the box. Otherwise people who purchase the Tempest and find that birds are perching on the unit, which can cause its haptic sensors to falsely detect rain, will have to order one and pay additional shipping charges. Given how WeatherFlow leverages the data collected from their customer’s stations (see more below) it would make sense for them to want the data to be as accurate as possible.
Conclusions About the Tempest Weather System
In the beginning of this article I talked about how WeatherFlow, in their early years, created a network of weather stations to improve the weather data collected around the country. WeatherFlow’s introduction of the original Smart Weather Station and the Tempest Weather System has provided them with a massive network of stations to improve weather forecasting throughout the country. When you step back and think about it, this was a truly brilliant business strategy. And, the quality that they have built into their weather station reflects both their goal of producing a quality product for consumers and their goal of producing accurate weather data to support their weather forecasting business
The Tempest Weather System is everything a homeowner would want in a weather station. It isn’t inexpensive but it is simple to setup, backed by a 60-day, money-back guarantee, a two-year warranty, and a 10-year extended warranty, and is easy to integrate into a smart home.


