Conserving water has become a critical issue in the U.S. According to the Environmental Protection Agency (EPA) the population of the U.S. has doubled over the last 50 years and our requirement for water has tripled. Population growth and increased demand for water has led forty states to anticipate water shortages by 2024.
While this sounds like a significant problem, access to clean water is much better in the U.S. than in other parts of the world. According to water.org, one in nine people in the world lack access to safe water.
Water use and the high cost of water has become even more important today with a large number of people being forced to work at home. Water has become more and more expensive. When people work at home, the cost of water used during the day is transferred from their employer to the employee working at home.
One way to save water in your home is to make sure you don’t have any plumbing leaks or running toilets. I’ve written about a number of products that can monitor your plumbing system for these kinds of leaks. You can find those articles here: Smart Water Management Solutions from Phyn, The 5 Best Smart Water Leak Detectors Compared
But, there is another way to save water. Back in August of 2019, I wrote an article “Smart Ways to Minimize the Expense of Heating Water in Your Home” in which I explored a number of techniques for reducing the cost of providing hot water in a home. One product I found very interesting when writing that article was the Chilipepper CP9000 recirculation pump ($249.99 MSRP). I thought this product deserved a second look because it could both conserve water and save money on utility bills.
Traditional recirculation pumps are typically used in very large homes where there are long distances between the water heater and places where hot water is used in a home, including bathrooms, the kitchen, etc. A recirculation pump circulates hot water throughout the home’s plumbing system so that when someone turns on, for example, a shower, it only takes a few seconds before hot water pours out. This is typically done for convenience and not for water conservation. Looking at this a different way, however, without a recirculation pump, it could take 30 seconds or more for the hot water to reach that shower head, wasting a full gallon of water*. When you consider how many times hot water is used in a home, that single gallon from one shower could add up to a significant amount of wasted water over the course of a year.
Using traditional recirculation pumps saves water but wastes a good deal of energy and increases the cost of heating water for a home. Heat from the water in the home’s pipes will quickly dissipate, causing the water heater to run much more then it would without the recirculation system.
The problem of having to pour water down the drain until hot water reaches the fixture where it is needed, on a smaller scale, exists in much more modest homes, too. Traditional, older homes typically have:
- The water heater located in the basement
- The kitchen and a powder room on the first floor
- The bedrooms and bathrooms on the second floor
In this scenario it can take quite a long time for hot water to reach the locations where it is used – especially the second-floor bathrooms. In an older, single-story, ranch-style home, the plumbing fixtures at the farthest end of the home from the water heater could be even farther away.
Even a home built with energy efficiency and conservation in mind has issues. In this type of home, the architect will have located the water heater as close as possible to the primary places where hot water is used. For example, in my own home, which is Energy Star rated, the water heater is located very close to where the bathrooms and laundry room are clustered in the home. It takes only a few seconds for hot water to reach the fixtures in our master bathroom. But even in our Energy Star-rated home, the kitchen sink is located 50 feet away from the water heater, and we have to waste a significant amount of water every time we wash dishes.
One solution is to use multiple, small, on-demand, water heaters instead of a single, large, central water heater. Small, on-demand, water heaters can be placed in a home close to the locations where hot water is used to minimize the amount of water that has to be wasted before hot water reaches the fixture where it is needed. This is a great solution for new construction. Unfortunately, these water heaters typically run on gas or high current, 240-volt circuits. Running new gas lines or wiring can be very expensive if these water heaters are to be installed in an existing home.
The Chilipepper CP9000 recirculation pump is different. It can:
- Easily be retrofit into an existing home or installed in new construction
- Eliminates wasting water each time you want hot water at a fixture that is far from the water heater
- Eliminates the energy wasted by a traditional recirculation pump
It is for these reasons that I felt the CP9000 deserved a more in-depth look.
Unlike a traditional recirculation pump, the CP9000 doesn’t continuously run. Instead, a homeowner has to activate the pump when they want hot water at the fixture where the CP9000 is located. The CP9000 will then take the cold or tepid water sitting in the hot water line and pump it into the cold water line until a temperature sensor detects that hot water has reached the pump. Now the hot water is at the fixture where it is needed, and no water has been wasted while waiting for hot water. Chilipepper estimates that a family of four can save 12,000 gallons of water in a single year and only use $2 of electricity.
It should be noted that one downside of the CP9000 is that it pumps tepid water into the cold water line. If you go to the faucet for a glass of nice, cold water you may have to add a few ice cubes. However, if you have a refrigerator with a built-in, cold water dispenser, this won’t be a problem.
Only one, or possibly two, CP9000 pumps should be required for an average home. By locating the CP9000 at the plumbing fixture that is farthest from the water heater, hot water will be made available at all the plumbing fixtures between the water heater and where the CP9000 is located. If, for example, you live in a ranch-style home with the water heater located in the middle of the home, then you might want two CP9000s. Each CP9000 would be located at the farthest fixture at either end of the home. Another case where you might want two CP9000s is when the water heater is located in the basement, your kitchen is located at the far end of the house on the first floor, and bathrooms are located on the second floor. One CP9000 could be installed in the kitchen and a second in the bathroom on the second floor that is farthest from the water heater.

Installation of the Chilipepper CP9000
The Chilipepper CP9000 is designed to be easily installed beneath any sink where a 120vac outlet is nearby. Typically, kitchen sinks have an outlet located beneath the sink for a garbage disposal. Most bathrooms have outlets near the sink and a qualified electrician should have little difficulty extending the wiring to add an additional outlet beneath the sink.
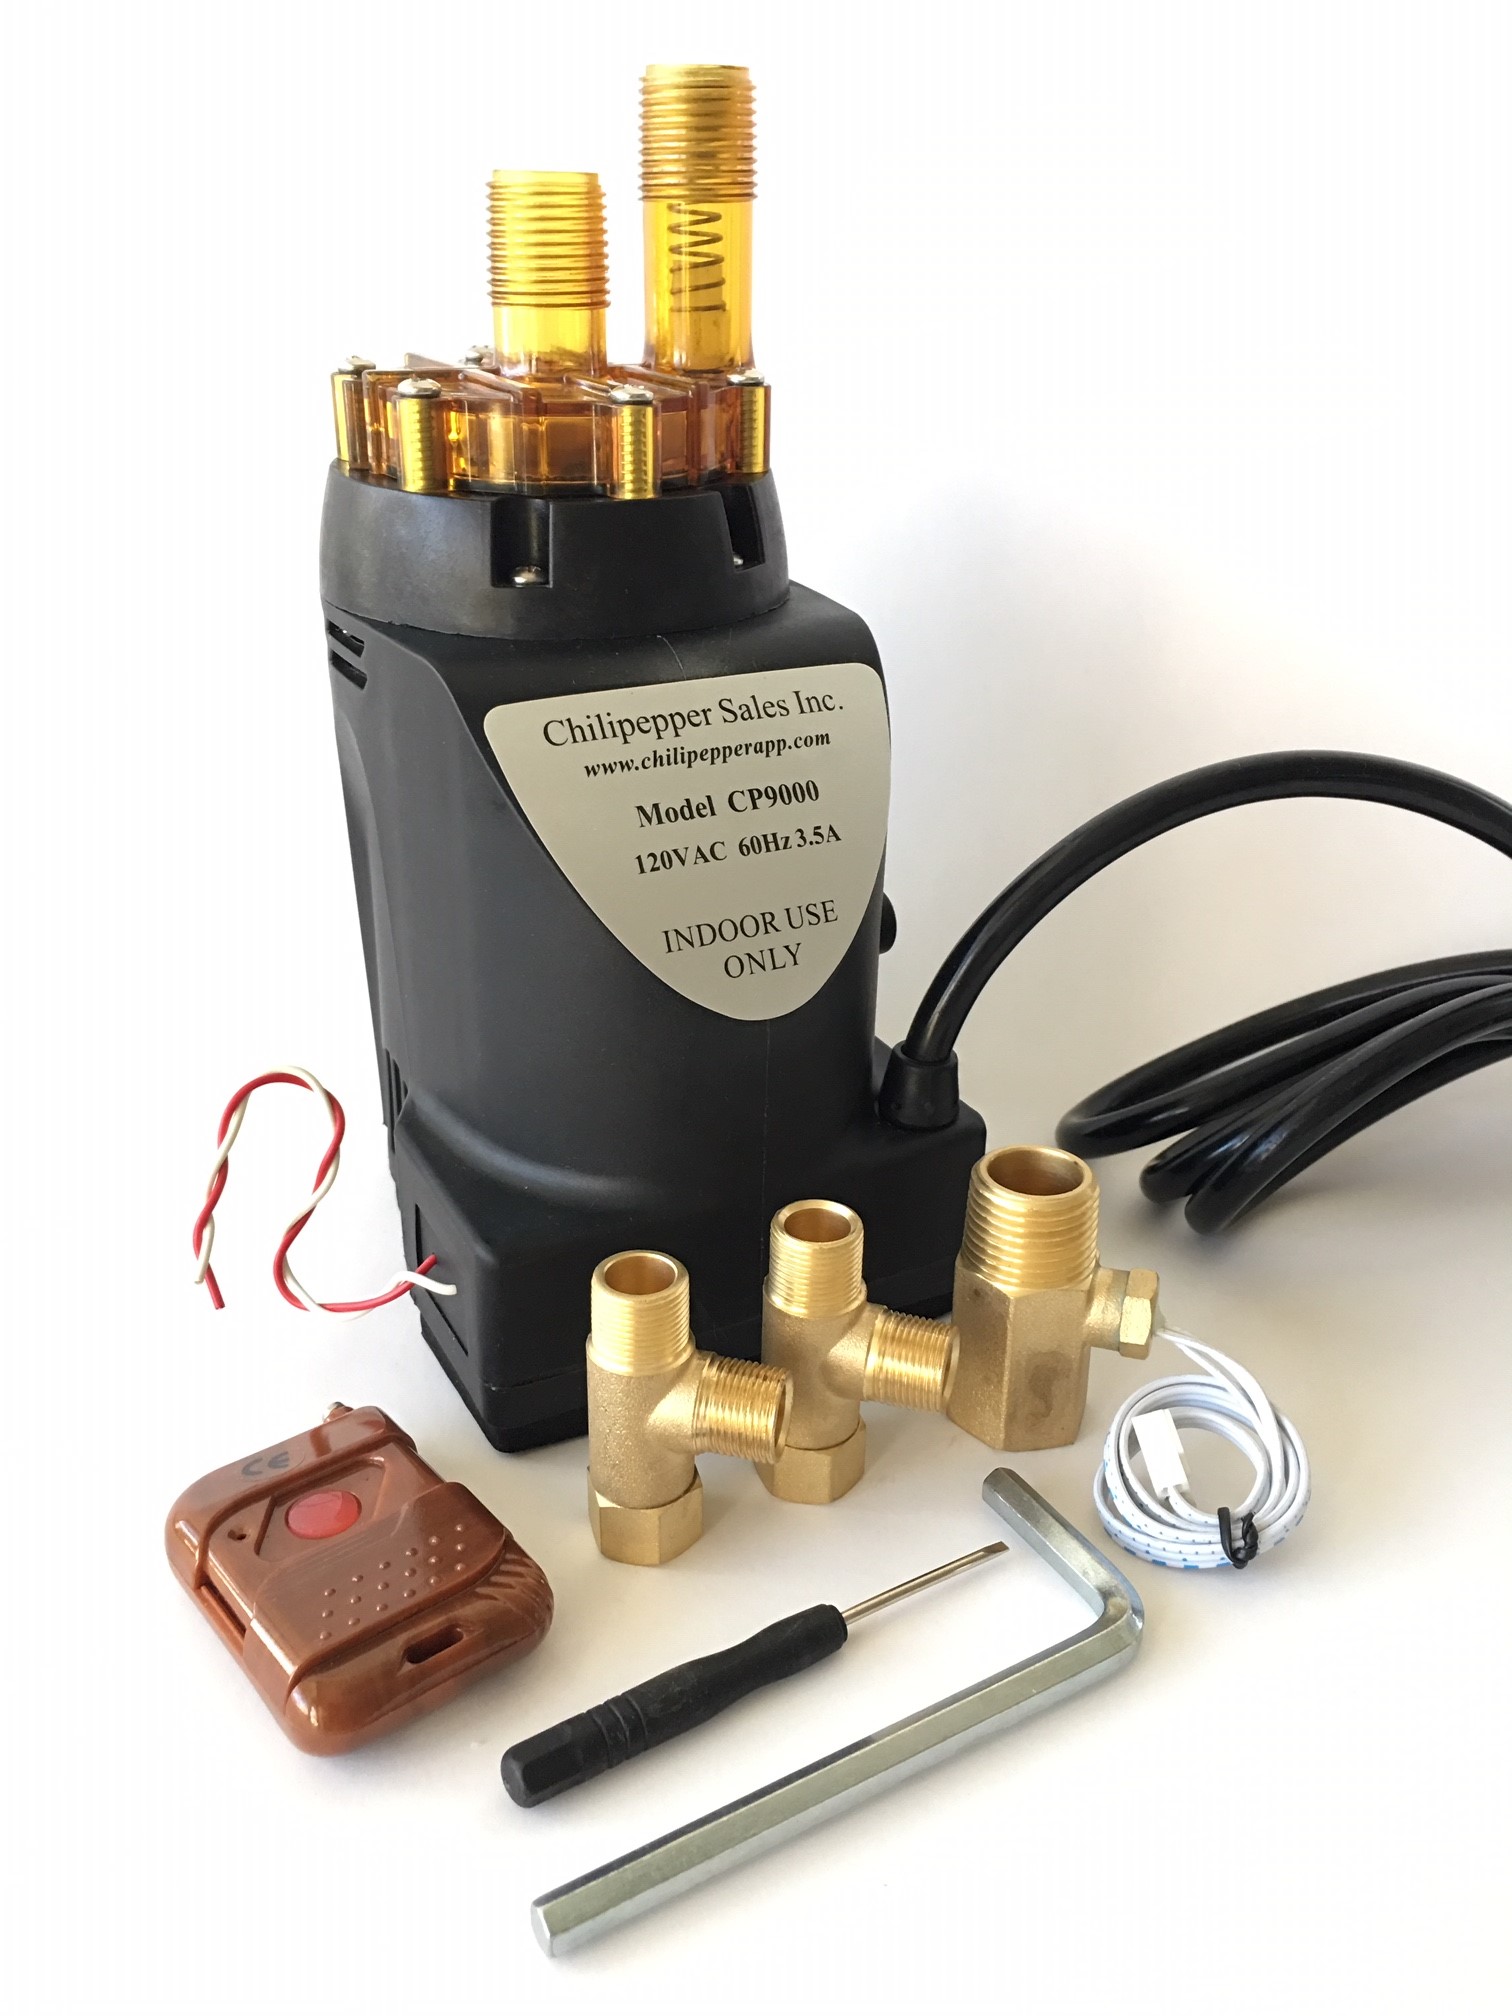
To install the CP9000, the first step is to screw the temperature sensor onto the CP9000 and plug its wire into the connector on the CP9000’s side.
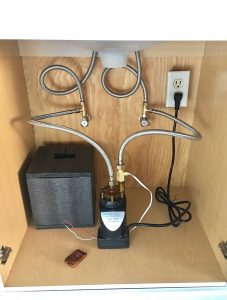
Assuming the CP9000 will be installed under a sink, two, brass T-connectors (included with the CP9000) then need to be installed between the hot and cold water cutoff valves, under the sink, and the supply lines that connected the cutoff valves to the faucet (REMEMBER TO SHUT OFF THE WATER FIRST!).
Next, two hoses are used to connect the CP9000 to the brass, T-connectors. These hoses are NOT included with the CP9000 and need to be purchased from a local hardware store or plumbing supply house. The length of these hoses will depend on how far the CP9000 will be located from the hot and cold cutoff valves with the T-connectors.
I highly recommend that you purchase hoses that have braided, stainless steel covers. While these hoses are more expensive, they have a much longer life than basic rubber hoses and can save you from a major flood from a broken hose. But, keep in mind that, for safety, even hoses with stainless steel braids should be replaced every five years.
The complete installation instructions for the CP9000 are available on the Chilipepper web site here. Shown in the above image is the foam packaging that the CP9000 is shipped in. This can be used during installation to muffle the sound of the pump during operation.
Hands on Installing the Chilipepper CP9000
Working inside a cabinet underneath a kitchen sink that is already crowded with a garbage disposal is never fun. However, installation of the CP9000 proved to be reasonably simple. The instructions are straight forward and well written.
Because the CP9000 doesn’t come with the hoses you need to connect it to your hot and cold water lines, you need to start by planning your installation to figure out how long you need these hoses to be. To make sure things were going to work correctly, I took a picture of the cutoff valves where the provided T-connectors would need to be installed. Then I went to a plumbing supply house with one of the T-connectors, the CP9000, and my picture. The helpful people at the plumbing supply house quickly set me up with the proper hoses.
Once I had the hoses, the installation proceeded smoothly, as long as you consider these helpful hints:
- Read the directions fully before you start. Priming the pump after it has been installed is very important. Everyone’s natural tendency is going to be to plug the pump in and give it a try once they have everything connected. Don’t do it! Running the pump without priming it can damage the internal seals.
- Also mentioned in the instructions is a hint for placing a sheet of newspaper underneath everything after you have the CP9000 connected and before you turn on the water. It is easy to miss a drop of water, from a very small leak, that falls on the bottom of your sink cabinet. However, a drop of water on a piece of newspaper is very easy to see. For complete peace of mind, leave the newspaper in place overnight, just to make sure there are no slow leaks. A very slow drip of water can lead to mold and rotting cabinets so this is a step that shouldn’t be skipped.
Once installed, the CP9000 is very simple to operate using the included remote control. Pressing the small button on the remote control instantly causes the pump to start, and it will run until the hot water reaches the pump’s temperature sensor. In my home it took 17 seconds for the pump to make hot water available at my kitchen sink.
I placed the remote control on the windowsill behind the sink where the CP9000 was installed, so it can easily be reached whenever hot water is needed. But, I installed the CP9000 below a kitchen sink, and there are times your hands are dirty and you don’t want to make a mess of the remote control. For this reason, I also wanted to control the CP9000 with voice commands.
Smart Home Integration and Control of the Chilipepper CP9000
The CP9000 is triggered by a small, wireless remote control. A second model, the CP9000B additionally includes a contact closure input for triggering the operation of the pump. This contact closure input can either be wired to a push-button switch or used to integrate the CP9000B into a smart home.

I came up with three relatively simple ways to integrate the CP9000B into a smart home that should work for a variety of people. Depending on the smart home infrastructure you’re dealing with, some variance of one of these techniques may be a better solution for you:
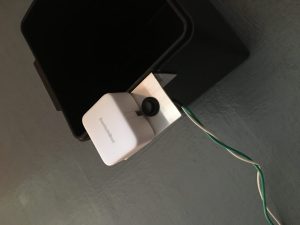
- The CP9000B comes with a small push button switch that you can connect to the contact closure input wires on the pump to activate it. You can press this button with a SwitchBot and trigger the SwitchBot through a voice command from either an Alexa, or Google Home smart speaker. It is important to note that to control a SwitchBot through one of these smart speakers you will also need the SwitchBot hub to connect the SwitchBot to your home’s Wi-Fi network.
- The wires from the CP9000B could be connected to a relay and that relay operated with a Zigbee smart switch. The smart switch can then be integrated with a hub, such as one from SmartThings or, possibly, Hubitat.
- Connect the wires from the CP9000B to a relay on a smart home processor from Crestron, Control4, or Savant
For testing I implemented the first of the above three solutions. I mounted the push-button switch and the SwitchBot to the plastic tub that came with the CP9000 using a small piece of aluminum angle stock purchased from a local hardware store. I simply drilled a half-inch hole for mounting the push button switch on one side of the angle stock and two small holes on the other side so I could screw the angle stock to the plastic tub. I also drilled pilot holes in the tub so the screws wouldn’t crack it and cut a small handle off the tub so the angle stock would lay flat. The SwitchBot was then mounted to the angle stock using the included 3M, double stick, pad so it could press the push button.
Finally, I performed the required account linking, so that my Alexa smart speaker could control this SwitchBot, and I was done.
Actual Water Savings from the Chilipepper CP9000
So how much water would all of this save me? Without using the pump, I turned on the hot water at my kitchen sink and ran the water into a bucket until hot water came out of the facet. I then measured the water in the bucket and found that every time I wanted to use hot water at the kitchen sink, I had been wasting a full gallon of water. When you consider that hot water is needed for cooking, cleaning, and a host of other activities, the savings will very quickly add up. I might not reach the manufacturer’s estimated savings of 12,000 gallons for a family of four; but it will still be a significant amount of water.
Chilipepper CP9000 Areas for Improvement
No product is perfect, and the Chilipepper CP9000 is no exception. There are a few ways I feel the product could be improved.
- The Chilipepper 9000 includes a moisture sensor and audible alarm that will sound if there is any water detected inside the CP9000. I would like to see a contact closure output that could be linked to an alarm system or smart home processor/hub. In either case the connected system could notify the homeowner of a problem. This would be invaluable if, for example, the CP9000 was installed in a vacation home that might be unoccupied for extended periods of time.
- For additional safety, I’d like to see an input on the CP9000 for an external moisture sensor that could be placed under the sink and trigger the CP9000’s alarm if, for example, one of the hoses connecting the CP9000 to the sink’s supply lines leaks.
- I would like to see a dedicated push button switch that includes an indicator light that is lit while the CP9000 is running and will go out when hot water is available.
- As mentioned earlier, on the CP9000B there are two wires that come out of the base of the pump. When these wires are momentarily connected, the pump will run. The wires can be connected to a simple push-button switch, a relay controlled by an automation processor/hub, etc. I believe these wires need to be longer. The CP9000 comes with a plastic tub that the pump can be placed in, so any water leakage is contained. However, the wires are so short you can’t even reach them when the pump is in this plastic tub. Longer wires would be much more convenient and would make sure that a connection to these wires is never submerged below water.
- A hex wrench and very, small screwdriver are included with the CP9000. It would be nice if the instructions came in a re-sealable plastic bag so these tools could be kept with the instructions to minimize their chance of loss over time.
Chilipepper CP9000 Summary
The CP9000 is simple to install and can save a family a significant amount of water – a very important, and increasingly expensive, natural resource. The included remote control makes saving water very easy. And, the CP9000B includes a contact closure interface that makes integration into any number of smart home platforms straight forward.
*This calculation is based on a shower head with a flow rate of two gallons per minute, located 75 feet from the water heater, and the connection is plumbed with half-inch diameter (inside) pipe.


